|
Homemade Wood Burning Stove
The Design:
 During the latest FTA Conference many of us had a chance to meet with Eb "Nimblewill Nomad" Eberhart. Eb had a chance to talk to us all about his amazing backpacking trip from Key West, Florida to Cape Gaspe, Canada; 4400 miles, 10 months. During this trip Eb did not carry any fuel. Instead he used a simple metal stove and burned leaves, bark, wood and other natural fuel to cook his meals. This design is based on the stove he used during his adventure. During the latest FTA Conference many of us had a chance to meet with Eb "Nimblewill Nomad" Eberhart. Eb had a chance to talk to us all about his amazing backpacking trip from Key West, Florida to Cape Gaspe, Canada; 4400 miles, 10 months. During this trip Eb did not carry any fuel. Instead he used a simple metal stove and burned leaves, bark, wood and other natural fuel to cook his meals. This design is based on the stove he used during his adventure.
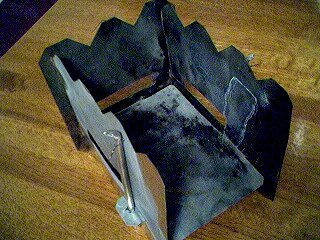
It's basically a wood burning box style stove. The front is open and the top is open. You just get a small fire going and put your pot on top. I've successfully made one and it boiled 3 cups of water in less than 5 minutes, once I got the fire going. The stove has air slots cut into the side walls which allow for excellent air flow. Also the stove bottom sits 1 inch above the ground so you might be able to use this stove on a bench or table. It's as "no-trace" as a Sierra Zip stove is in my humble opinion.
 I made one out of Galvanized Steel (Roofing Steel). You can sometimes find scraps out at construction sites or just visit any hardware store. It weighs a little under 4 oz. total and breaks down into a nice little 6" by 5" package which might fit into some cooking pots. I made one out of Galvanized Steel (Roofing Steel). You can sometimes find scraps out at construction sites or just visit any hardware store. It weighs a little under 4 oz. total and breaks down into a nice little 6" by 5" package which might fit into some cooking pots.
I know what the "Sierra Zip Stove People" are saying at this moment, "It doesn't have a fan!?". No fan, no batteries --- just make yourself a blow tube. Take a small 2-3 inch piece of copper tube and attach a 12-15" section of plastic hose. Gently blow into the hose to increase the air flow to the fire. This method also works good on camp fires and you don't lose your breath. The stove seems to radiate the heat back into the fire which helps get things burning good.
The Scans:
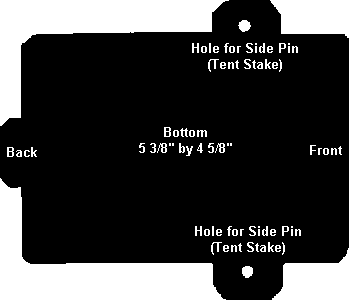
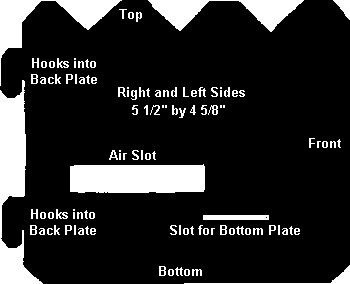
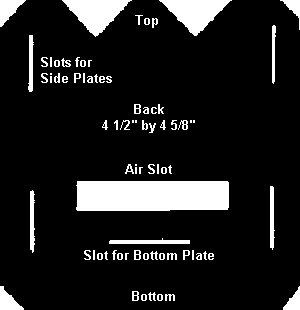
Here are the three traces needed to make the stove. You need to make 2 sides, a bottom and a back. Copy these 3 "GIF" files from this Web page. Place your cursor over the image, right mouse click, then choose "Save Picture As...". Then using a graphics program, print these 3 images to the width and length stated on the graphics. Here are the images:


Tools Required:
There are couple special tools required: tin snips to cut the metal, a Dremel with a cutting wheel to cut the slots (or some other cutting tool) and a drill to cut the holes.
Disadvantages:
The only downfall to my current stove is the thickness of the steel used. After a while the stove walls might burn up. Other Disadvantages: smoke can bother allergies, smoke blackens your pots badly, you have to add fuel regularly and fuel needs to be dry.
Advantages:
Advantages are obvious: no fuel to carry, breaks down into a very small package, you can carry the ashes away if you like, no movable / breakable parts, smoke will rid you of mosquitoes, no batteries needed.
Jeff Walters |